Let's build a Movie App in React Native using TMDB API
First of all Happy New Year to all of you, I hope you all are doing well.
I always wanted to write a blogpost on technical topics and this is my first attempt at it, I hope you will find it helpful, suggestions and tips for making future posts are more than welcome 😀
Finished Codebase:
Final App That we will have by the end of this article:
| HomeScreen | MovieScreen |
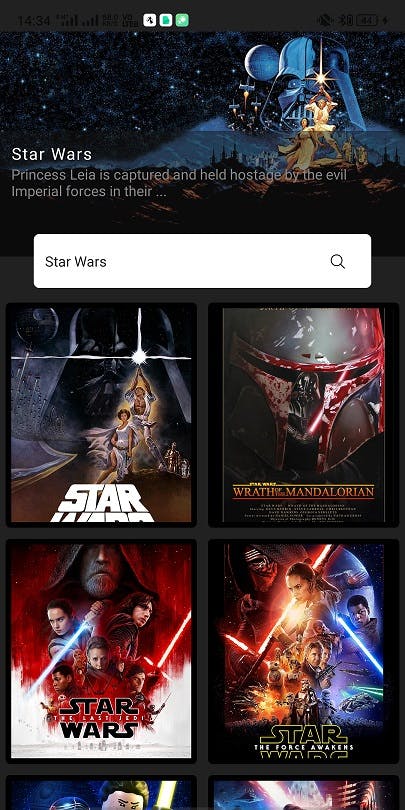 | 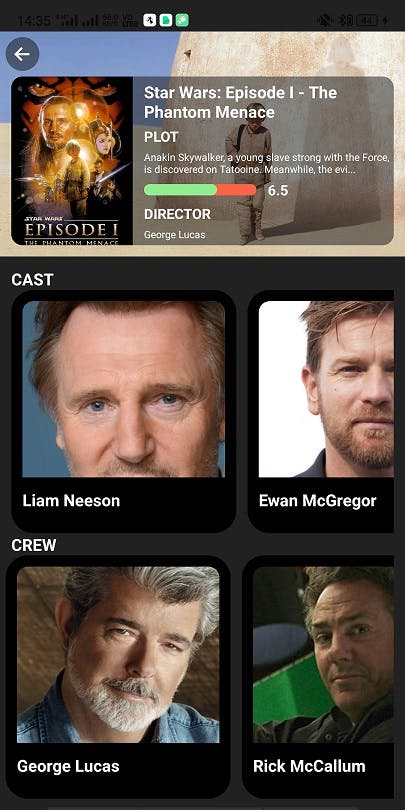 |
So, without any delay, let's jump into it.
1. First thing, Get the API Keys:
To fetch movie data from TMDB API we will need to get the API keys. So Let's do that.
Create an account on TMDB.
After that, you can find your API keys, here: API keys
It Should look this:
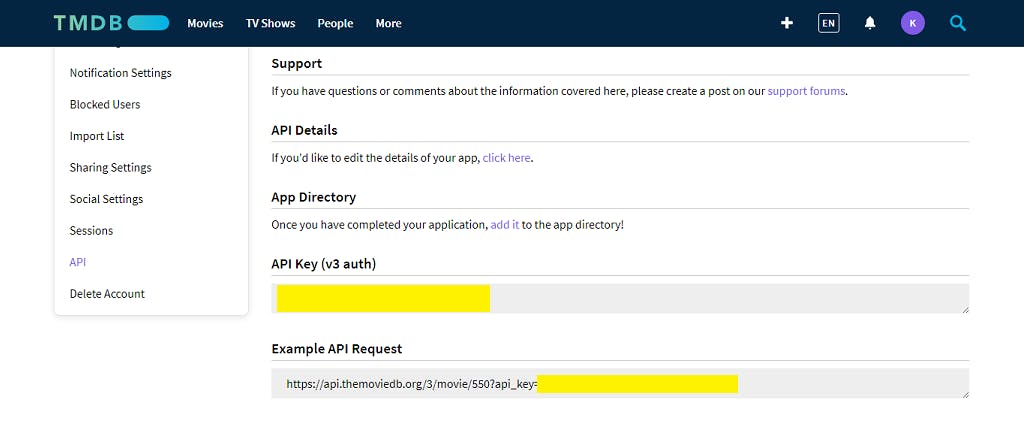
PS: I have seen that themoviedb.org is not opening sometimes directly, so use a VPN if you are facing this problem.
2. Create A Project:
I am building this app on snack.expo.io because it is very fast to get started and installing dependencies is a breeze as compared to setting up a project on a local machine.
3. Our Project Structure:
Arrange the initial Project File structure like given below:
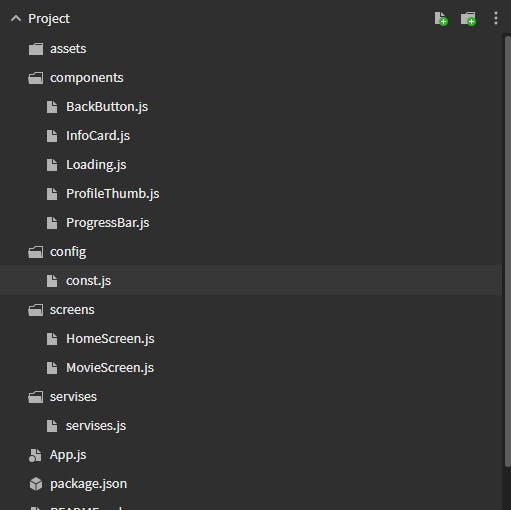
Now we will work on it, one part at a time.
4. Let's set up const.js and services.js first:
Open config/const.js, and store our base URL and API keys here:
/* config/const.js */
export const URL = 'https://api.themoviedb.org/3/';
export const API_KEY = 'YOUR API KEYS';
Now let's set up the servises.js utility functionality which will be the core of our app, it will be responsible for fetching the movie data which we will use for rendering purposes.
Here we are using axios for fetching the data from TMDB, when you type this code, you will get the red error message at the bottom of expo.snack editor saying:
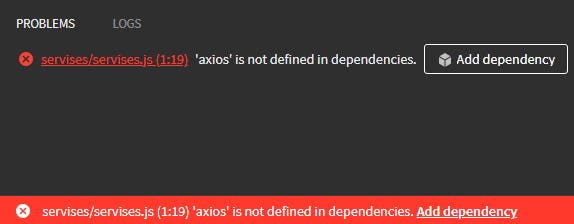
To get rid of it, just press on [Add dependency] button and the axios will be installed almost instantly, this will be the case every time we will be using the external package, you will have to do the same when we will set up our Navigation in App.js.
I love this feature of expo.snack, no more waiting for dependency installation as it is the case most of the time while developing the app on a local machine :)
but if you are a patient soul then install axios, @react-navigation/native and @react-navigation/stack from cmd one by one :
> npm install axios
> npm install @react-navigation/native
> npm install @react-navigation/stack
Our Finished services.js file looks like below:
/* servises/services.js */
import axios from 'axios';

/**
 * we are importing the base URL and API_KEY from our const.js
 * */
import { URL, API_KEY } from '../config/const';

/**
 * fetchMovies takes one parameter, "search".
 * "search" is a search term which we will get from the TextInput
 * component of HomeScreen.js screen, if the "search" is empty
 * then we will fetch the list of movies from the movie/popular route of
 * TMDB API which will give us a list of current popular movies,
 * and if the search term is not empty, we will fetch the data of
 * searched movie.
*/

export const fetchMovies = async (search) => {
  console.log('fetch movies', search);
  if (!search) {
    const response = await axios.get(`${URL}movie/popular?api_key=${API_KEY}`);
    return [...response.data.results];
  } else {
    console.log('in else');
    const response = await axios.get(
      `${URL}search/movie?api_key=${API_KEY}&language=en-US&query=${search}`
    );
    return [...response.data.results];
  }
};

/**
 * we will call this function from our MovieScreen.js screen,
 * fetchCredits take one parameter "id" which will be used for
 * fetching cast and crew of the movie.
 * it returns the name of the director and the list of crew and
 * cast which we will use later in this article
*/
export const fetchCredits = async (id) => {
  const response = await axios.get(
    `${URL}movie/${id}/credits?api_key=${API_KEY}`
  );
  console.log(response.data.crew);

  /**
   * here we will search the name of director
   */
  const director = response.data.crew.find(
    (dir) => dir.known_for_department === 'Directing'
  );
  const credits = response.data;
  return { director: director, credits: credits };
};
5. Setup our Navigation:
In our Stack Navigation, we have two screens, HomeScreen, which will be displayed initially and has a functionality to search and display fetched movie list, and the second one is MovieScreen, to which we will navigate after clicking the movie poster which will be rendered on HomeScreen.
After writing this code, you will see the same error message that we got before at the time of axios, install all the dependencies by clicking on the error message and you will be good.
Here we are using React Navigation v5, which is very easy to use and understand.
I can go on explaining the working of it but the documentation is so well written that I highly recommend giving it a read.
/*App.js*/
import React from 'react';
import { createStackNavigator } from '@react-navigation/stack';
import { NavigationContainer } from '@react-navigation/native';
import { Text } from 'react-native';
import HomeScreen from './screens/HomeScreen';
import MovieScreen from './screens/MovieScreen';

const Stack = createStackNavigator();
/**
 * 1. In our <Stack.Navigator> we have prop called headerMode="none",
 * it specifies that we don't want the header bar in our app, thus the value
 * "none".
 * 2. In our <Stack.Screen> we have two props, "name" and  "component",
 * "name" prop's value is used whenever we will be navigating from
 * one screen to another.
 * For example, if want to navigate to MovieScreen from HomeScreen then
 * we can do that using navigation.navigate("Movie"), as you can see,
 * we are using, the value of the name prop that we used while setting
 * up the Stack Screen for MovieScreen component.
*/
export default function App() {
  return (
    <NavigationContainer>
      <Stack.Navigator headerMode="none">
        <Stack.Screen name="Home"  component={HomeScreen} />
        <Stack.Screen name="Movie" component={MovieScreen} />
      </Stack.Navigator>
    </NavigationContainer>
  );
}
6. Building Components, aka Building blocks of our app:
The following image shows the various components that we will be creating to build our app.
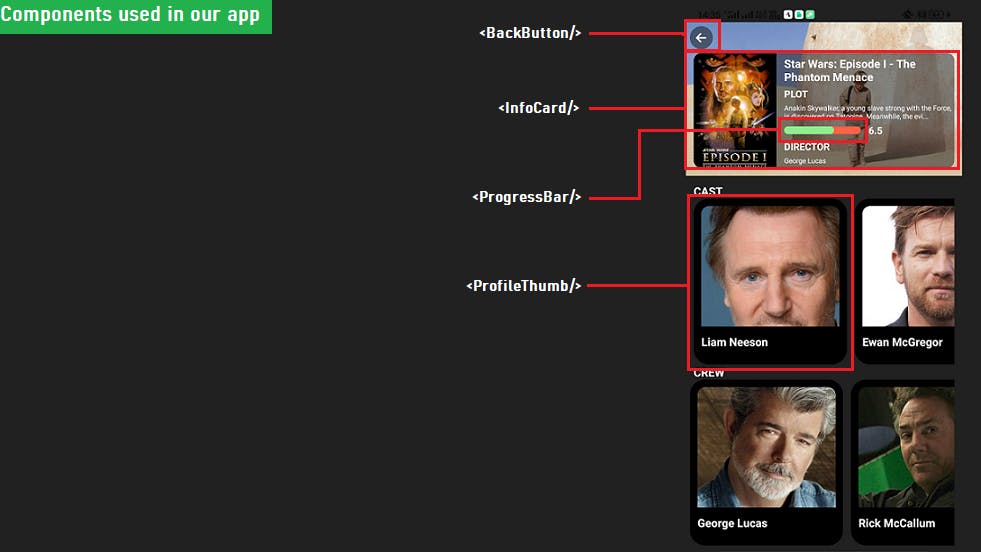
/* components/BackButton.js */
import React from 'react';
import { TouchableOpacity, View, StyleSheet } from 'react-native';
import { Ionicons } from '@expo/vector-icons';

/**
 * screen, navigation.pop() removes the topmost screen from Navigation
 *Stack and takes us back, in this case, HomeScreen.
*/

const BackButton = ({ navigation }) => {
  return (
    <TouchableOpacity style={styles.backBtn} onPress={() => navigation.pop()}>
      <Ionicons name="md-arrow-back" size={20} color="white" />
    </TouchableOpacity>
  );
};

export default BackButton;
const styles = StyleSheet.create({
  backBtn: {
    position: 'absolute',
    left: 5,
    top: 5,
    zIndex: 100,
    width: 30,
    height: 30,
    backgroundColor: 'rgba(21,21,21,0.5)',
    borderRadius: 15,
    justifyContent: 'center',
    alignItems: 'center',
  },
});
/* components/InfoCard.js*/
import React from 'react';
import { Text, View, Image, StyleSheet, Dimensions } from 'react-native';
import ProgressBar from './ProgressBar';
const screen = Dimensions.get('window');

/**
 * Our InfoCard component takes two props, "movie" and "director"
 *from MovieScreen. "movie" prop is the object holding movie
 *details like which we will use to show poster, title, overview,
 *and vote_average.
 */

const InfoCard = ({ movie, director }) => {
  return (
    <View style={styles.infoCard}>
      <Image
        source={{
          uri: `http://image.tmdb.org/t/p/w780${movie?.poster_path}`,
        }}
        style={styles.poster}
      />
      <View style={styles.textInfo}>
        <Text style={styles.title}>{movie.original_title}</Text>
        <Text style={{ color: 'white', fontWeight: 'bold' }}>PLOT</Text>
        <Text style={{ color: 'white', fontSize: 10 }}>
          {movie.overview.length < 100
            ? movie.overview
            : movie.overview.substr(0, 100) + '...'}
        </Text>
        <View style={{ flexDirection: 'row', alignItems: 'center' }}>
          <ProgressBar vote_average={movie.vote_average} />
          <Text style={{ color: 'white', fontWeight: 'bold' }}>
            {movie.vote_average}
          </Text>
        </View>
        <>
          <Text style={{ color: 'white', fontWeight: 'bold' }}>DIRECTOR</Text>
          <Text style={{ color: 'white', fontSize: 10 }}>{director?.name}</Text>
        </>
      </View>
    </View>
  );
};

export default InfoCard;

const styles = StyleSheet.create({
  infoCard: {
    position: 'absolute',
    bottom: 10,
    left: 10,
    right: 10,
    top: 40,
    paddingRight: 10,
    backgroundColor: 'rgba(21,21,21,0.5)',
    borderRadius: 10,
    overflow: 'hidden',
    flexDirection: 'row',
  },
  poster: {
    width: screen.width * 0.3,
  },
  title: {
    color: 'white',
    fontSize: 16,
    fontWeight: 'bold',
  },
  textInfo: {
    left: 10,
    right: 10,
    flex: 1,
    justifyContent: 'space-evenly',
  },
});
/* components/ProgressBar.js*/
import React from 'react';
import { View } from 'react-native';
/**
*Just a bit of CSS to show vote_average on a scale of 100.
*/
const ProgressBar = ({ vote_average }) => {
  return (
    <View style={styles.main}>
      <View
        style={[styles.child, { width: Math.abs(10 * vote_average) }]}>
     </View>
    </View>
  );
};

export default ProgressBar;

const styles = StyleSheet.create({
  main: {
    width: 100,
    height: 10,
    backgroundColor: 'tomato',
    borderRadius: 5,
    marginRight: 10,
  },
  child: {
    position: 'absolute',
    height: 10,
    backgroundColor: 'lightgreen',
    borderRadius: 5,
  },
});
/* components/ProfileThumb.js */

import React from 'react';
import { StyleSheet, Text, View, Image } from 'react-native';

/**
 * ProfileThumb is rendered in MovieScreen FlatList,
 * it is used to render both, Cast's ThumbNail and Crew's ThumbNail.
 * It takes "item" prop, which has the data about a person,
 *
 * In this component, we are just rendering their thumbnail image and
 * name.
 * You can extend its functionality, let's say, click on thumbnail and
 * navigate to a new screen showing their filmography.
 * Very simple to implement.
*/

const ProfileThumb = ({ item }) => {
  return (
    <View style={styles.profileThumb}>
      <>
        <Image
          source={{
            uri: `http://image.tmdb.org/t/p/w342${item?.profile_path}`,
          }}
          style={styles.crewImages}
        />
      </>
      <View style={styles.nameCard}>
        <Text style={styles.title}>{item.name}</Text>
      </View>
    </View>
  );
};

export default ProfileThumb;

const styles = StyleSheet.create({
  crewImages: {
    width: 200,
    height: '100%',
    borderColor: 'black',
  },

  profileThumb: {
    height: '100%',
    flexDirection: 'column',
    width: 200,
    backgroundColor: '#212121',
    borderRadius: 20,
    marginRight: 10,
    borderWidth: 10,
    overflow: 'hidden',
  },
  nameCard: {
    position: 'absolute',
    left: 0,
    right: 0,
    bottom: 0,
    backgroundColor: 'black',
    paddingVertical: 10,
  },
  title: {
    color: 'white',
    fontSize: 16,
    fontWeight: 'bold',
  },
});
/* components/Loading.js */
import React, { useEffect, useState } from 'react';
import { Text, View, ActivityIndicator } from 'react-native';

/**
 * This Component will show a circular loading
 * indicator in the center of the screen while the servises.js
 * functions are fetching the data from TMDB.
*/

const Loading = () => {
  return (
    <View
      style={{
        flex: 1,
        justifyContent: 'center',
        backgroundColor: 'rgb(21,21,21)',
      }}>
      <ActivityIndicator size="small" color="#0000ff" />
      <Text style={{ color: 'white', alignSelf: 'center' }}>
        loading too long? setup api keys in config/const.js ...
      </Text>
    </View>
  );
};

export default Loading;
7. Finally, Our two main Screens:
HomeScreen and MovieScreen are our two final pieces in the app which will bind all of the above elements together to create a final working app.
/* screen/HomeScreen.js */

import React, { useEffect, useState } from 'react';
import {
  Text,
  View,
  StyleSheet,
  Image,
  TextInput,
  Dimensions,
  FlatList,
  TouchableOpacity,
} from 'react-native';
import { Card } from 'react-native-paper';
import { EvilIcons } from '@expo/vector-icons';
import Constants from 'expo-constants';
import axios from 'axios';

import Loading from '../components/Loading';
import {fetchMovies} from "../servises/servises";

const screen = Dimensions.get('screen');

const HomeScreen = ({ navigation }) => {
  const [movies, setMovies] = useState([]);
  const [searchTerm, setSearchTerm] = useState('');
  const [loading, setLoading] = useState(true);
  const [searchNow, setSearchNow] = useState(false);

/**
 * useEffect will initially fetch the recent popular movies,
 * as the "searchTerm" is empty, it has a dependency "searchNow".
 * Whenever we click the search button, the "searchNow" value
 * will be toggled, and the useEffect will be triggered and
 * this time if "searchTerm" is not empty then we will get the
 * the new list of movies based on "searchTerm"
*/

  useEffect(() => {
    setLoading(true);
    fetchMovies(searchTerm, movies).then((data) => {
      setMovies(data);
      // set loading to false after movies are fetched.
      setLoading(false);
    });
  }, [searchNow]);

/**
 * below, while the data is being loaded, the value of loading is true,
 * and while it is true, the <Loading/> component will be rendered,
 * as soon as movies are fetched the loading state is set to false
 * the actual data is rendered.
*/

  return loading ? (
    <Loading />
  ) : (
    <View style={styles.container}>
      <View>
        <Image
          source={{
            uri: `http://image.tmdb.org/t/p/w780${movies[0]?.backdrop_path}`,
          }}
          style={styles.banner}
        />
        <View style={styles.bannerInfoCard}>
          <Text style={styles.bannerTitle}>
            {movies[0]?.original_title.substr(0, 20)}
          </Text>
          <Text style={styles.bannerOverview}>
            {movies[0]?.overview.substr(0, 80) + '...'}
          </Text>
        </View>
      </View>

      <View>
        <View style={styles.inputCard}>
          <TextInput
            style={styles.input}
            placeholder={'search movies'}
            value={searchTerm}
            onChangeText={(text) => setSearchTerm(text)}
          />
          <TouchableOpacity
            onPress={() => {
              setSearchNow(!searchNow);
            }}>
            <EvilIcons
              name={searchTerm ? 'search' : 'refresh'}
              size={20}
              color="black"
              style={{ alignSelf: 'center', marginHorizontal: 20 }}
            />
          </TouchableOpacity>
        </View>

         {/*rendering clickable poster thumbnails, when clicked, we will
         be navigated to MovieScreen*/}

        <View style={styles.movieListCard}>
          <FlatList
            data={movies}
            numColumns={2}
            renderItem={({ item, index }) => {
              return (
                <Card style={styles.movieCard}>
                  <TouchableOpacity
                    onPress={() => {
                      /**
                        * here we are navigating to "MovieScreen", which has a path
                        * name of "Movie" which we set back in <Stack.Screen/>
                        * of App.js.
                        * We are also passing the parameter with it, {movie: item}
                        * we will access it in MovieScreen
                       */
                      navigation.navigate('Movie', { movie: item });
                    }}>
                    <Image
                      source={{
                        uri: `http://image.tmdb.org/t/p/w780${item.poster_path}`,
                      }}
                      style={{ width: Constants.width, height: 200 }}
                    />
                  </TouchableOpacity>
                </Card>
              );
            }}
          />
        </View>
      </View>
    </View>
  );
};

export default HomeScreen;

const styles = StyleSheet.create({
  banner: { width: Constants.width, height: 200 },
  bannerInfoCard: {
    position: 'absolute',
    bottom: 0,
    paddingHorizontal: 10,
    paddingTop: 10,
    paddingBottom: 50,
    right: 0,
    left: 0,
    backgroundColor: 'rgba(21,21,21,0.5)',
  },
  bannerTitle: {
    color: 'white',
    fontSize: 16,
    letterSpacing: 1.2,
  },
  bannerOverview: {
    color: 'grey',
  },
  container: {
    flex: 1,
    paddingTop: Constants.statusBarHeight,
    backgroundColor: '#212121',
  },
  inputCard: {
    position: 'absolute',
    top: -40,
    margin: 20,
    left: 10,
    right: 10,
    flexDirection: 'row',
    backgroundColor: 'white',
    alignItems: 'center',
    borderRadius: 5,
    zIndex: 100,
  },
  input: {
    padding: 10,
    flex: 1,
  },
  movieCard: {
    flex: 1,
    height: 200,
    margin: 5,
    alignSelf: 'center',
    overflow: 'hidden',
    borderWidth: 5,
  },
  movieListCard: {
    top: screen.height * 0.05,
  },
});
/* screen/MovieScreen.js */
import React, { useEffect, useState } from 'react';
import {
  Text,
  View,
  StyleSheet,
  Image,
  TextInput,
  Dimensions,
  FlatList,
  TouchableOpacity,
} from 'react-native';
import Constants from 'expo-constants';
import Loading from '../components/Loading';
import ProgressBar from '../components/ProgressBar';
import ProfileThumb from '../components/ProfileThumb';
import BackButton from '../components/BackButton';
import InfoCard from '../components/InfoCard';
const screen = Dimensions.get('window');
/**
 * importing fetchCredits function from servises.js
 * we will use this function to fetch the list of crew and casts
 * and render them
 */
import { fetchCredits } from '../servises/servises';

export default function MovieScreen({ navigation, route }) {
  const [credits, setCredits] = useState(null);
  const [loading, setLoading] = useState(true);
  const [director, setDirector] = useState('');
  /**
   * below, we are getting the params that we passed
   * while navigating from HomeScreen.
   * we will use it to make an fetch request to
   * get crew and cast list based on movie.id.
   */
  const { movie } = route.params;

  useEffect(() => {
    /**
     * set the loading state to true as we start fetching
     * credit details. while loading is true we will
     * see the <Loading/> component, just like
     * in HomeScreen
     */
    setLoading(true);
    /**
     * we will pass movie.id to fetchCredits()
     * which will return us the list of cast, crew, and director
     */
    fetchCredits(movie.id).then((data) => {
      setCredits(data.credits);
      setDirector(data.director);
      setLoading(false);
    });
  }, []);

  return loading ? (
    <Loading />
  ) : (
    <View style={styles.container}>
      <View>
        {/**
      render <BackButton/>
      we will pass navition prop too, so that we can
      return back to HomeScreen
       */}
        <BackButton navigation={navigation} />
        <Image
          source={{
            uri: `http://image.tmdb.org/t/p/w780${movie?.backdrop_path}`,
          }}
          style={styles.banner}
        />
        {/**
        <InfoCard/> component takes movie and director
        props, which we used in the previous section.
         */}
        <InfoCard movie={movie} director={director} />
      </View>
      <View style={styles.credit}>
        <>
          <Text style={styles.title}>CAST</Text>
          {credits && (
            <FlatList
              data={credits.cast}
              renderItem={({ item }) => <ProfileThumb item={item} />}
              horizontal
            />
          )}
        </>
        <>
          <Text style={styles.title}>CREW</Text>
          {credits && (
            <FlatList
              data={credits.crew}
              renderItem={({ item }) => <ProfileThumb item={item} />}
              horizontal
            />
          )}
        </>
      </View>
    </View>
  );
}

const styles = StyleSheet.create({
  banner: { width: window.width, height: 200 },
  credit: {
    flex: 1,
    padding: 10,
  },
  container: {
    flex: 1,
    paddingTop: Constants.statusBarHeight,
    backgroundColor: '#212121',
  },
  title: {
    color: 'white',
    fontSize: 16,
    fontWeight: 'bold',
  },
});
Phew, that was exhausting but I am glad that I finished this post, as I have mentioned in the beginning, I have been wanting to write a technical blog post for so long but always avoided it by making up some reason or other, but I really enjoyed writing this one, I know, I have a long way to go before I could even consider myself a half-decent technical writer, but hey, we all start from somewhere 😀
Finally, Once again Happy New Year to All the readers, and Happy Coding 👩💻
